Turn Every Visit into Actionable Feedback
Thanksgiving is all about gathering and gratitude. Rewarding your loyal customers is a great way to strengthen your relationship and remind each pet parent that they can depend on you to care for their treasured companions. Keeping those relationships strong, especially during the busy holiday season, depends on strong communication and continuous improvement. Your clients can share their feedback and express thanks in simple ways that will help your business grow and boost retention.
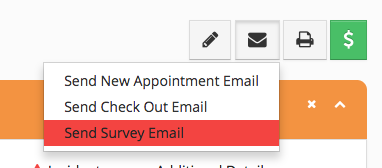
After all, keeping a pulse on how pet parents feel about your facility is one of the easiest ways to improve service, prevent churn, and generate more glowing online reviews. Gingr’s built-in checkout surveys make this process simple and automated. No extra tools required!
Our latest webinar walks through how to:
- Build and customize your checkout survey form
- Control when and how surveys are sent
- Get notified about negative feedback and track staff follow-ups
- Use the Surveys report to spot trends
- Connect Broadly to push positive feedback out to online review sites
Watch the Webinar On Demand
Why Use Checkout Surveys?
Checkout surveys in Gingr help you:
- Collect timely feedback right after a reservation ends
- Quickly catch and recover from bad experiences with alerts on low ratings
- Standardize follow-up so your team always knows who needs outreach
- Turn great experiences into social proof using the Broadly integration to request online reviews
Everything is managed directly in Gingr, so your team doesn’t have to juggle extra systems or manually send survey emails.
Step 1: Build Your Checkout Survey Form
Start by setting up the questions you want to ask.
- Go to the Admin (gear icon).
- Search for “Checkout Survey” and open that page.
- Click the Checkout Survey Form tab.
Here, you’ll see a familiar form builder:
- Use the toolbox on the side to add fields (range sliders, short answers, multiple choice, etc.). New fields will appear at the bottom; drag and drop to reorder them.
- Most facilities rely heavily on the range field (for example, “Rate your overall experience” on a 1–10 scale).
- You can edit the range (e.g., 1–5 or 1–10)
- Set a default position (centered, or slightly positive)
Target Questions by Reservation Type
A powerful part of this form is that each field can be tied to specific reservation types:
- Edit a field and choose which reservation types it applies to (e.g., only daycare, only boarding, or grooming, etc.).
- This lets you build one comprehensive survey form, while Gingr shows only the relevant questions to each customer based on what their pet was checked out from.
When you’re done, click Save to lock in your survey form.
Step 2: Control When Surveys Are Sent
Next, decide when pet parents get survey emails.
- Go to Reservation Types & Services Configuration.
- Choose a reservation category (e.g., Daycare).
- Click into a specific reservation type (e.g., Daycare – Full Day).
- Edit that reservation type and scroll to Communication Options.
You’ll see two key settings:
Email survey minutes after checkout: Set how long after checkout the survey email should send (for example, 10 minutes after checkout).
Email survey every number of reservations: Controls how often a customer gets a survey for that reservation type. For daycare, you might not want to email them every single time they attend.
Example: Set this to 20, and they’ll receive a survey after every 20th daycare checkout, rather than daily.
These settings are configured per reservation type, so you can:
- Send surveys frequently for boarding or grooming, where visits are less frequent.
- Space them out more for high-frequency daycare guests.
Make sure the types you want feedback on have both the timing and interval set appropriately.
Step 3: Fine-Tune Checkout Survey Settings
Go back to Admin > Checkout Surveys and open the Checkout Survey Settings tab.
Here, you can control:
Survey Trigger Alert Threshold (System-Wide)
- This is a global setting for your entire app.
- Set the rating threshold that counts as “negative feedback” (for example, 5 or below on a 1–10 scale).
- When a survey response hits that threshold or lower, Gingr can flag it so your team knows it’s time to step in and follow up.
You can choose how strict you want to be—higher threshold if you want to be notified even for “average” scores, lower if you only want alerts for very poor experiences.
Location-Specific Survey Text
Below the threshold setting, you’ll find per-location messaging:
- Customize the checkout survey text that customers see (for example, in the customer portal).
- Each location can have its own message, tone, or instructions.
This is a great place to thank them for their visit and briefly explain how their feedback helps you improve.
Step 4: Make Sure the Right People See Negative Feedback
You’ll want managers or admins to be notified when negative feedback comes in.
- Click the Reports & More (book icon).
- Go to Groups.
- Open the Notifications tab.
- Search for “Negative survey feedback”.
Enable this notification for the groups that should be alerted—typically:
- Admins
- Managers
- Any other team leads who handle customer service and follow-ups
Once enabled, people in those groups will see alerts and can take action quickly when a customer has a poor experience.
Step 5: Customize the Survey Email
The email that sends the survey link is a system email, just like your other automated communications.
- Go to Admin > System Email.
- Scroll to the first email in the list related to checkout surveys.
- Make sure its Status is set to Enabled.
- Customize the body and subject as you’d like.
One important detail: this email uses a special variable called the action URL (you’ll see it already included).
- This link takes customers directly to their survey in the customer portal.
- Be sure not to remove it—just style the text around it as desired.
Because it’s a system email, it will appear in the client’s Communication / View History with the usual metrics (sent, opened, bounced, clicked, etc.), just like other emails.
Step 6: Use the Surveys Report to Follow Up and Improve
Once responses start coming in, you’ll manage them from the Surveys report.
- Click the Reports & More (book icon).
- Go to Reports and search for “Surveys”.
- Set your date range (for example, yesterday, last week, last month).
On this report you’ll see:
- Animal and owner
- Reservation type they were checked out from
- Ratings for each part of their experience
- Overall response details and timestamps
Staff Follow-Up Notes
For any response—especially negative ones—you can:
- Check the Staff follow-up box.
- Add a note about the conversation you had with the customer or the resolution you provided.
That note is:
- Time-stamped
- Tied to the user who entered it
- Stored alongside the response for future reference
If you need to update the note later, you can overwrite it and clearly mark the update text with the date/time (for example: “Update on 12/5 – spoke with owner again…”).
Helpful Actions
From the Actions menu on each survey response, you can:
- View the reservation
- View the animal
- View the owner
- Send an email directly from that screen to follow up
You can also export survey data to Excel if you’d like to analyze trends, create charts, or share reports with your leadership team.
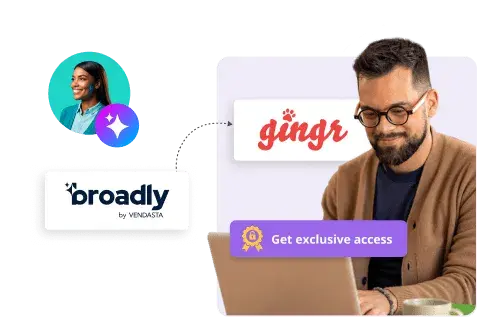
Step 7: Turn Great Feedback into Online Reviews with Broadly
Gingr integrates with Broadly, a third-party platform that helps you turn happy customers into positive online reviews.
To connect it:
- Go to Admin > Integrations.
- Find Broadly (it appears near the top of the list).
- Click Start Broadly for Free and follow their sign-up instructions.
- Once you have an account, enter your Broadly Location ID in Gingr and enable the integration.
After that, you can set a positive survey threshold:
- When a survey response meets or exceeds that threshold, it can be sent to Broadly.
- Broadly then helps route those happy customers to leave reviews on platforms like Google or other online review sites, depending on your configuration and subscription.
Broadly offers multiple subscription tiers and may provide additional outreach options (including SMS) on their side. You’ll manage those details directly with Broadly, while Gingr continues to feed in your positive survey results.
Bringing It All Together
With checkout surveys in Gingr, you can:
- Automatically send tailored surveys at smart intervals
- Customize questions by reservation type
- Get alerted when feedback dips below your comfort level
- Track and document staff follow-ups for negative responses
- Amplify positive experiences online via Broadly
Watch the Webinar On Demand
If you haven’t set up checkout surveys yet, this is a great time to:
- Build or refine your checkout survey form.
- Review your reservation types to set survey timing and frequency.
- Confirm your alert thresholds and group notifications.
- Explore the Surveys report to see how you’re doing today.
From there, you’ll have a powerful feedback loop that keeps pet parents heard, staff informed, and your reputation growing—one checkout at a time.
Additional Learning Links:
- Checkout Surveys (Topic Outline)
- Set Up Checkout Surveys (Process)
- Surveys Report (Reference)
- Broadly App (Topic Outline)
Turn Everyday Checkouts Into Powerful Customer Insights with Gingr
Ready to put checkout surveys to work for your business? Log in to your Gingr app to explore your survey settings, fine-tune your questions, and start gathering real-time feedback from pet parents today.
If you’re not using Gingr yet, now’s the perfect time to see what it can do for your facility! Book a personalized demo and discover how Gingr can help you streamline operations, delight customers, and keep those tails wagging.


Subscribe to the Gingr Blog